Table Of Content

Keeping them separate will make you more methodical and, more importantly, allow you to go back if you feel that you made mistakes during the process. People often prefer to have a specific part of the drawing in each layer. For example, a layer with the finished lines just below the layer with the base colors, a layer for the shadow, a layer for the light, etc. For the pigtails, you will have to draw something similar to a ponytail. The hair will go behind your character’s ears, making it a unique and neat hairstyle. You can add some random clumps to pop out in different parts of the hair.
How Do You Distinguish Between Girl and Boy Anime Hairstyles?
Anime hair is perhaps the most iconic aspect of anime characters; therefore, it is an essential skill if you are interested in learning how to draw anime characters. We will find that the drawing process is the same with both anime girl’s hair and anime boy’s hair. Anime characters are very androgynous and, in many ways, the hair becomes a contextualizing factor of character genders. There are also various ways to create anime hair for both female and male anime characters, which makes anime hairstyles a fun drawing exploration. In this tutorial on how to draw anime hair, we will find that the drawing process is quite simple and allows for a lot of creative exploration. Once the drawing process is broken down into its basic fundamental steps, you can then play around with changing hairstyles for various anime characters.
Watch Articles
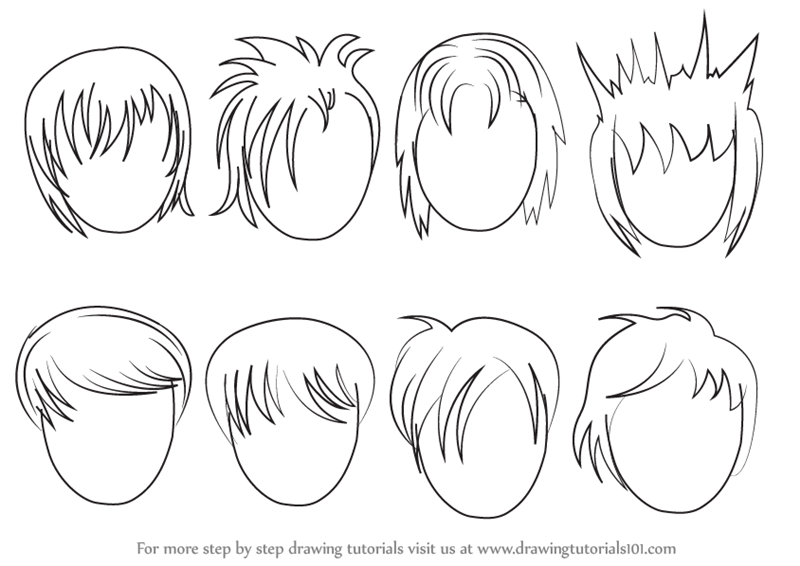
Most anime hair drawing tutorials use round arrows coming from the top part of the head to indicate the shape of the head and hair. Whether you are drawing long anime hair or short and spiky hair, you always want to make sure you have different references. This can be a great addition to anime hairstyles that is super simple and more shape-dependant than detail-dependent. This way of drawing anime hairstyles can work well as a way of emphasizing other features of character as well. Now that we have a base underdrawing to work from, we can focus on drawing the final line art for our anime girl and her hair.
Step 3: Draw Final Line Art
It is a good idea to keep shading very basic in the beginning. If you are just starting out, get to the point where you are happy with most of your designs and lines and the overall drawing, and get to shading then. In this step I drew over the underdrawing with more precision.
We can also start to sketch in some hair along the hairline, to start establishing the positioning of the hair. Making sure we have a character’s face fleshed out will determine what type of hairstyle will suit the character. The eyes are particularly important as they carry a lot of emotions for the character. We want to work on all the features of the face making sure we build the character so that the hair does not look out of place. In many ways anime hair is not just about the hair itself but how it suits the anime style and therefore the character’s features. We can also draw hair that flows from the ponytails and falls on each side of the face, this way we give some length to the tied-up hair.
How to Draw Anime Girl Hair for Beginners – Final Thoughts
Draw the side sections of the hair somewhat hugging the shape of the head. Give each one a little clump around the ears and a split on it’s end. Above is a line by line drawing video of the messy looking hair. You can watch it and then read the more detailed drawing instructions below. Here we are at the end with the two drawings next to each other. Here we can understand clearly the similarities and differences between the two, such as shape, proportions, contrast, details and so on.
How to draw an anime character in Procreate - Creative Bloq
How to draw an anime character in Procreate.
Posted: Thu, 31 Aug 2023 07:00:00 GMT [source]
When you’re done, erase the hairline, the outlines of the character’s head shape, and any other parts of the head and face that are covered by the hair. If you want, color the hair in and add some highlights. The first thing to do is to explore various anime hair references. Looking at anime hair references is going to help you gain an awareness of how different hairstyles affect the character. Anime hairstyles can range from realistic to cartoon- it all depends on what style you would like to draw your anime characters in. If you are going with a more realistic effect, you will find that layering becomes more of a strategy to achieve this aesthetic in your anime hair drawing.
Step 4 – Draw the Hair on Top & at the Back of the Head
You must be able to take care of those parts before you get to drawing the details. You can even stop before the details and still have a very interesting drawing! The details can make a good illustration even more beautiful but cannot hide the defects that are already there. Hair creates waves and therefore areas of light and shade. And it is thanks to this wave that the strands of hair appear. It is with the variations of light and shadow that we perceive different objects, because they stand out from their background.
There are many fun brushes you can easily download and use. You don’t need to over-zoom and glue your face on the screen to be sure the lines are perfect! To be quite honest, you are likely to be the only one that will be able to spot your small mistakes. Take breaks if you are lost, and look up new references to refresh your eyes. Make sure to leave them open while you draw; it will help a lot. Don’t be afraid to delete what looks wrong and try again.
In doing this it becomes easier to see your mistakes and to evaluate the entire design. Focus heavily on the silhouette of the hair, since it is where most visible mistakes are made. In this phase, you can make the lines thicker where they intersect or where shadows will be. The brush for lineart can be the same as for sketching, but this will depend on how you want it to look. I highly recommend looking at the standard brushes or checking Clip Studio Assets.
You can feel free to determine length and thickness, but try to use thicker bunches of hair shapes so as to not make your anime character’s hair too choppy or messy. Once you’re happy with the overall shape, it’s time to add some highlights and shadows. I often merge all my layers instead of leaving several as I prefer to draw that way, but it is best to keep all your layers separate.